Manage worklists
You can use a worklist to create a collection of studies that you want to view as a group. The studies in a worklist are selected based on the data source and conditions you set. For example, you could create a worklist that includes all studies with a specific modality that originate from a specific data source.
Every time you access a worklist, the worklist is automatically updated to include any new studies that meet the worklist conditions. The studies are not actually moved to the worklist; the worklist just provides you with an easy way to access them.
Note
You can also use folders to create a group of studies (see Manage folders).
Add a worklist
Worklists created by users with no administrative privileges are automatically private. Users with administrative privileges can create public worklists that can be accessed by all OptosAdvance users and can also assign worklists to specific users or groups.
- In the Patient Study Directory, select
 . You can also right-click (or tap and hold) an existing worklist, then select Copy.
or
Select Settings. Under Preferences, select Work Lists and Folders. Select Add. You can also select an existing worklist, then select Copy. - Enter the following information, then select Save.
Name
Worklist name.
Category
You can use categories to organize your worklists in the navigation tree. To place this worklist in a category, enter the category name. Note that the category will be created if it does not already exist.
Comment
Worklist description.
Default
Administrators only. Allows you to specify a default worklist for new users when logging in for the first time.
Disabled
If selected, the worklist will be hidden in the navigation tree.
Folder
Do not select this option. This will create a folder instead of a worklist (see Manage folders).
Deidentify
If selected, studies in this worklist will be anonymized when viewed in OptosAdvance. Select Nominal to use the default anonymization profile or select a profile you have created (see Manage confidentiality profiles).
Note
Once the worklist is created, you cannot change the Deidentify option.Note
Studies are only anonymized when opened from a worklist or folder with the Deidentify option. Regular patient data will appear if a study is opened from the Patient Study Directory.Groups
(Administrators only) Select the groups that can access the worklist. Note that this option is not available if no groups are currently defined.
Users
(Administrators only) Select the users that can access the worklist. Note that if you do not have administrative privileges, any worklists you create will be private worklists that only you can access.
- To create a public worklist that all users can access, do not select any users.
- To create a private worklist for specific users, select one or more users in the Unassigned area, then select Add. These users will see the worklist in their My Worklists area. To remove a user’s access, select a user in the Assigned area, then select Remove.
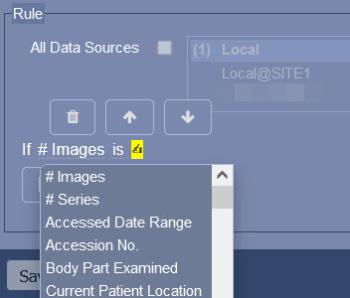
Rule
Specify the rule for the worklist by adding one or more conditions. All conditions must be satisfied in order for a study to be included in the worklist.
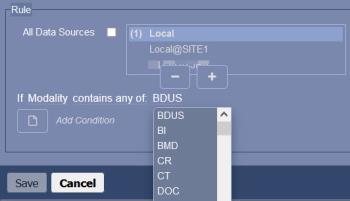
- Select All Data Sources to search all data sources when selecting studies for the worklist.
or
Select a data source from the list to select studies from this data source only.
Note that if a data source has any existing rules (from other worklists), the number of existing rules is shown before the data source name. When you select the data source, the existing rules are shown. You can delete the existing rules if desired (see step 4).
- Select Add Condition. Customizable areas are underlined and are highlighted when you hover over them. Click (or tap) a customizable area to edit it.
To add an item to a condition, select a customizable area, then select +. To remove an item, select -.
- To delete a condition, select the first customizable area, then select
.
- To move a condition to a new position, select the first customizable area, then select
.
Edit or delete a worklist
In the Patient Study Directory:
- Right-click (or tap and hold) a worklist.
- Select Edit. Modify the details, then select Save.
or
Select Delete.
In Settings:
- Select Settings. Under Preferences, select Work Lists and Folders.
- Select a worklist.
- Select Edit. Modify the details, then select Save.
or
Select Delete.